How to install a mid-drive e-bike conversion kit
The Cyclotricity Mid-Drive 250W mounts at the crank, replacing your bottom bracket, so there's no wheel to change — it drives through your existing gears for the most natural feel and best hill-climbing. You need a standard 68mm or 73mm threaded BB shell. The motor has a built-in torque sensor, so there's no separate PAS disc — just a spoke magnet for the speed reading. Allow about two hours; the trickiest part is removing your old bottom bracket.
Watch the installation
Tools you'll need
- Adjustable wrench
- Set of Allen keys
- Flat and crosshead screwdrivers
- Grease / lubricant
- Zip ties
- Tyre pump
- Crank puller
- Bottom-bracket removal tool (to suit your old BB)
What's supplied
- Cyclotricity Mid-Drive 250W kit
- Battery — frame or rear-rack (or your own 36V battery)
- Spoke speed-sensor magnet (included)
- 1
Check your bottom bracket shell
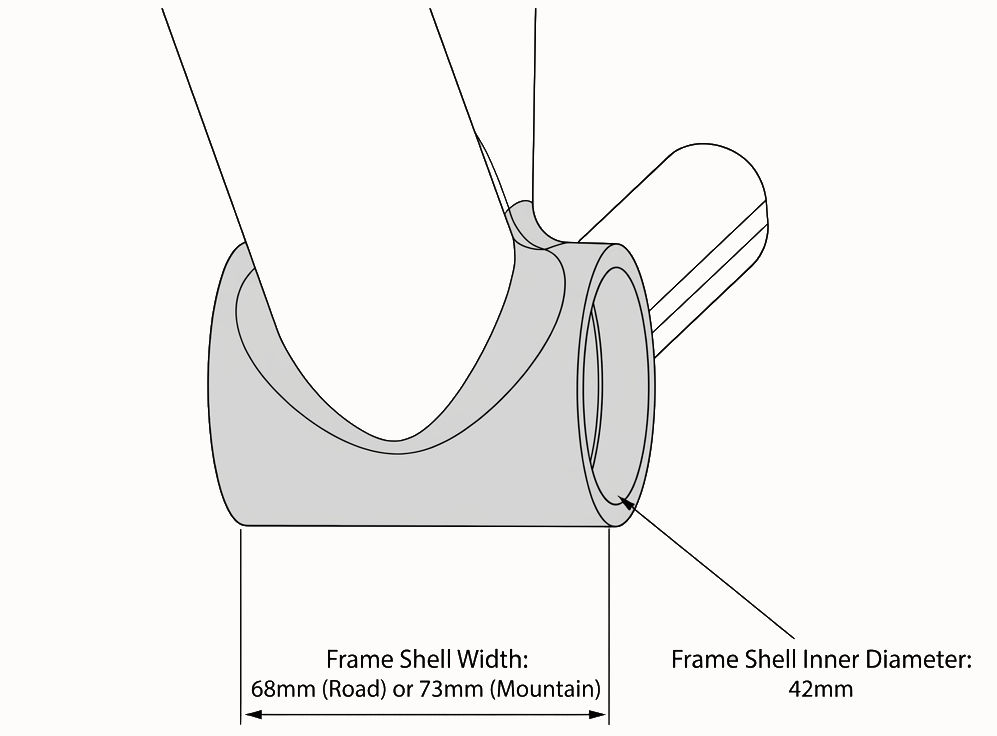
The mid-drive bolts onto your frame's bottom-bracket shell — it must be a standard 68mm or 73mm threaded shell, which covers the vast majority of road, hybrid and mountain bikes. Lay out the parts and keep the manual to hand.
- 2
Remove the cranks and old bottom bracket
Remove both crank arms with a crank puller, then unthread your existing bottom bracket with the correct BB tool. Clean the shell threads. This is the only step that needs specific tools — any bike shop can do it in minutes if you'd rather not.
- 3
Remove the front derailleur
The mid-drive replaces your front chainring, so the front derailleur and front shifter come off, taking you from 3×N to 1×N gearing. Your rear gears stay exactly as they are — and with motor assist you won't miss the front mech.
- 4
Fit the mid-drive motor to the shell
Slide the motor's axle through the BB shell, fit the lockring and clamp, and torque it so the unit is held firmly with the chainring lined up with your rear sprockets. Refit the supplied crank arms.
- 5
Fit the brake cut-off levers and speed magnet
Install the supplied brake cut-off levers so braking kills the motor, then fit the spoke magnet and speed sensor — the mid-drive's torque sensor is built into the motor, so the magnet is only there to give the display a speed reading. Set the magnet to pass within a few millimetres of the sensor.
- 6
Mount the battery and controller
Bolt a frame battery to the down-tube bosses or clip a rack battery to the supplied pannier rack, and secure the controller with cable ties clear of the cranks.
- 7
Connect the colour-coded cabling
Match and click together the colour-coded, plug-and-play connectors — motor, battery, brakes, speed sensor and display — then tidy the loom with cable ties.
- 8
Mount the display and test ride
Clamp the 5-level backlit LCD display on the handlebar. Power up and check the torque-sensing assist responds smoothly as you push on the pedals and that both brakes cut the motor. Re-check the BB clamp bolts after your first ride. Need a hand? Contact Cyclotricity.